How To Make Augmented Reality Headset?
Building an AR headset is an amazing journey as it combines 3d printing , optics, electronics, hand detection algorithm , 3d game engine & mechanics.
Project North Star is an augmented reality headset which is open-sourced by Leap Motion. So we explored their research to build the headset.
Hardware Components:
-
3d Printed Parts: We're using Simplified Version of Exiii. You can download 3d files from this Link. We printed the parts using Creality Ender 3 Pro. You can also print these from other companies(In India go to 3Ding).
-
Reflectors: We bought it from Smart-Prototyping
-
Displays: We used two OSOYOO 3.5" LCD screens. Buy from here

-
Leap Motion Controller: It's the most advanced Hand Tracking Technology. It has 180°x180° tracking. By using leap motion technology you can interact with the virtual objects(check out or experiment of Apple Fruit). No Gloves or handheld controllers required. You can embed this in your VR or AR Headsets. Its hand tracking is fast, accurate & powerful on mobile processors with low latency and high accuracy. You can explore more demos on leap motion website.Buy from here

-
JDA156 Mini DisplayPort™ to Dual HDMI Adapter: this is used to connect two pi screens with a laptop. The JDA156 utilizes multi-stream transport (MST) protocol, supporting up to 2 displays independently at up to 4K @ 30 Hz each with DP 1.2. Buy from here
-
Usb cables : Two type C USB Cable for the power supply of screens.
-
Hdmi Cable: Buy from here

Use 1 Screw to create LCD Frame. And 3 Screws to attach LCD Frame with Front Frame.

Use this port to connect hdmi from the Laptop/Desktop. Its on the Top of the right LCD Screen.

Use this port of right LCD to connect Charging cable from the Laptop/Desktop. You can also use a power bank to power the screen. Its on the top of Headset.

Use this port of left LCD to connect Charging cable from the Laptop/Desktop. You can also use a power bank to power the screen. Its on the bottom of Headset.

Use this port of left LCD to connect hdmi cable from the Laptop/Desktop. Its on the left side of Headset.

We used a Jute Round Hat, which is working as a head support. we tied the hat with threads.

We used Unity Plus 2018.3.7f1 (you can use Personal Edition also which is free)running on Alienware 17(16 GB RAM, Geforce GTX 880m with Microsoft Windows 8.1 . Download LeapAR unity package from github & import it into your project. While import , you'll face some blend files errors. To remove these errors you can skip this files from the importing window of Unity.
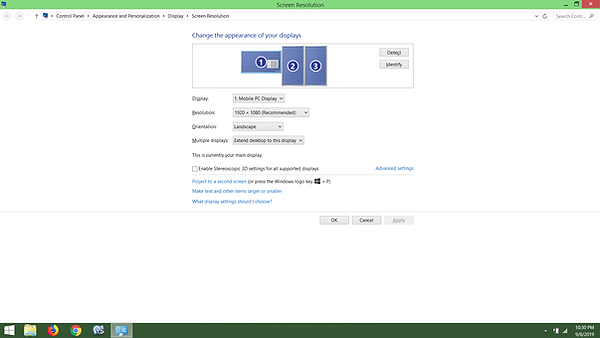
After Connecting Screens with Laptop(using JDA 156) , you need to set the resolution as per the following screenshots. In our headset, 2nd screen is flipped so we need to flip that in the orientation option. See our tutorial on how to connect 2 screens with laptop.


You'll see the screens display like this. As you see, Taskbar of the windows is on the bottom.

Now, you need to change the source Code. Search for CalibrationDeformer.cs, WindowOffsetManager.cs,WindowOffsetManagerEditor.cs & change the Pixels from 2880,1600 to 2160,1920 . See the following screenshots for your reference.


You need to set the X Shift , Y Shift to 1920, 1080 in the Window Offset Manager(Script) of the ARCameraRig Game Object in Unity. To move the Game View to the screens, you need to click on the "Move Game View to Headset". See the below screenshot.

When you run the unity app, You'll see virtual hands are not alligned with your real hands. Now this is time to calibrate. You can use Leap Motion North Star or Eswar Blog.
In our setup, we manually changed the position,rotation of the gameobject. For this you need to run the app & move the gameobjects in the scene to align the virtual hands with real hands. Once your hands are aligned , note down the values then stop the app . Now, change the values in the inspector. weve highlighted the gameobjects which are required in the following screenshot.

To grab , pick an object (apple) in app, you need to add Rigid body, sphere collider, Anchorable Behaviour(Script), Interaction Behaviour(Script). We used the Fruit Pack Unity asset for our sample.See the following screenshots for your reference.


LICENSE
Leap Motion open sourced Project North Star under Apache License 2.0. Project North Star Simplified Version also uses data open sourced under this license.
http://www.apache.org/licenses/LICENSE-2.0
Exiii Inc. publish 3D data and document about Project North Star Simplified Version under CC BY 4.0. You can use these data under following condition.
https://creativecommons.org/licenses/by/4.0/
If you would like to use these data, please credit as follows:
CC BY 4.0, exiii Inc.
Talking about Augmented Reality, it is one of the 9 pillars of Industry 4.0 i.e. Fourth Industrial Revolution as per following article:
